
In short. Tap Layers (the stacked squares) for the panel. + adds a layer above the one you’re on; tap a layer to paint on it, drag it by its handle to move it. Under the list are the chosen layer’s opacity, blend mode, Lock, Alpha and Clip. Hold a layer (right-click on a Mac) for Group, Merge Down and the rest.
The layers panel
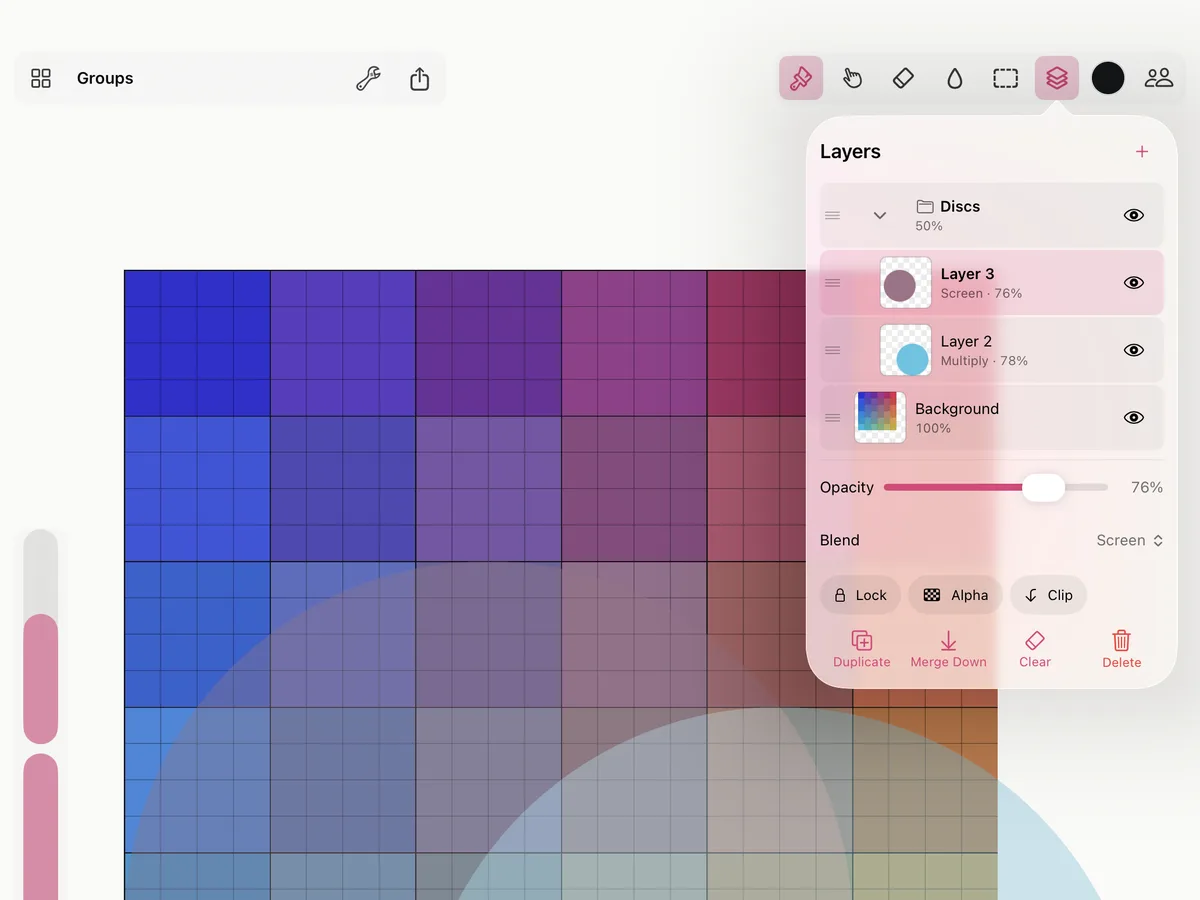
The list shows the top layer first, each with a thumbnail. Tap a layer to paint on it, the eye to hide or show it, and drag a layer by its handle to move it up or down.
+ adds a layer above the one you’re on. Below the list, the buttons duplicate the layer, merge it down into the one below, clear it, or delete it. Each of these is one step of undo.
Hold a layer (right-click on a Mac) for its menu: Rename…, Duplicate, Merge Down, Group, Clear and Delete.
Opacity and blend modes
Opacity fades the whole layer, without changing what’s painted on it. Blend sets how it mixes with the layers below: Normal, Multiply, Screen, Overlay, Soft Light, Add, Darken, Lighten, Color or Luminosity.
Lock, alpha lock and clipping
- Lock: nothing paints on the layer at all.
- Alpha (alpha lock): paint lands only where the layer already has paint. Good for recoloring a shape without going over its edges.
- Clip: the layer shows only where the layer below it has paint, like a clipping mask. When there’s nothing below to clip to, the panel says so.
Groups
A group is a folder of layers that blend together first, then with the rest of the painting through the group’s own opacity and blend mode. Hide the group and its layers go with it.
- Make one: hold a layer and choose Group. The layer goes into a new folder.
- Add a layer: drag it into the folder, or, on the layer just above a folder, choose Add to the Group Below.
- Close and open it with the chevron on the folder’s row.
- Take layers out: drag them out of the folder, or choose Ungroup to empty it and keep its layers.
Delete on a folder deletes it with everything in it, as one step of undo. A group holds layers, not other groups.
Pictures to paint from
In the Actions menu (the wrench at the top left), Import from Photos… and Import a File… bring a picture in (on a Mac, Import a Picture…). It arrives as a layer of its own, selected, so you can move, scale and turn it right away (see Selection and transform).
To trace or paint from it, turn on Reference in the layer’s menu: the picture stays out of exports, and the same menu can lock it, show it in Black and White, or Tint it blue, red or sepia. Flatten to a Normal Layer turns it back into paint like any other.
Layers in a session
In Paint Together, each person paints on their own layer. A layer that’s someone else’s can’t be painted on, unless the host turns on Shared for it.
How many layers
The free version holds five layers in a painting (folders don’t count); Smudjo Unlocked takes the limit away. Inside someone else’s session, there’s no limit for anyone.